
2UUL DA91 3 in 1 Screen Opener
₱350.00
Out of stock
The 2UUL DA91 "XYZ" 3-in-1 Screen Opener is a specialized set of ultra-thin, stainless steel prying cards designed for safely disassembling smartphones, tablets, and other electronic devices. It is primarily used by repair technicians to separate screens, back covers, and other glued components without causing damage.
Features and specifications
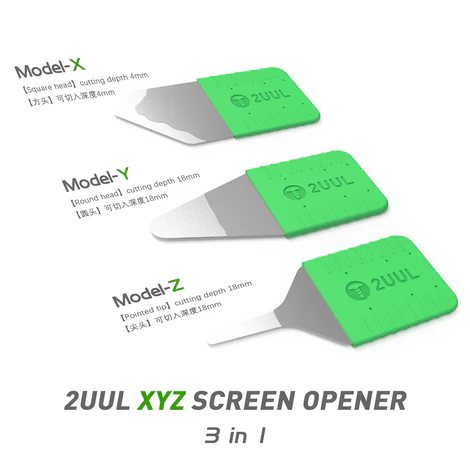
3-in-1 set: The DA91 kit includes three distinct pry cards, labeled "X," "Y," and "Z," each with a different tip for specific applications.
Model X
: A square-head tip with a short insertion depth, typically used to get the initial opening started.
Model Y
: A rounded-head tip with a greater insertion depth, ideal for cutting through the adhesive once a gap is created.
Model Z
: A pointed tip with a greater insertion depth for tight spots and corners.
Material: The cards are made from durable, high-toughness, 0.1mm stainless steel. The material is strong enough to handle stubborn adhesives but also maintains the flexibility needed to avoid scratching delicate components.
Ergonomic handle: Each tool features a wrapped handle to improve comfort and grip during use and to protect the technician's hands.
Precision: The 0.1mm thickness of the blades allows for delicate and precise prying, minimizing the risk of damage to the LCD screen or other sensitive parts.
Versatility: The tool is suitable for a wide range of devices, including iPhones, Android phones, iPads, and other electronics.
How to use the 2UUL DA91 screen opener
Using a 2UUL DA91 screen opener requires care and an understanding of the device you are repairing. It is a precise tool for professional-level tasks, not for novice users.
Preparation: Always begin by applying heat to the edges of the device's screen or back cover to soften the adhesive. Use a heat gun or heating pad, but be cautious to avoid overheating, which can damage internal components.
Initial separation: Select the Model X (square head) to begin prying. Insert the thin edge into the seam between the frame and the screen to create a small gap.
Widen the gap: Once the initial gap is made, switch to the Model Y (round head). Slide it along the edge to slice through the adhesive, using gentle pressure and care to avoid internal cables.
Navigate corners: For tricky corners or areas with tight adhesive, use the Model Z (pointed tip) to carefully work the tool into place.
Lift and detach: Continue working your way around the entire device until the screen or back cover can be safely lifted off.
Important considerations
Consult a guide: Before using the tool, always consult a specific repair guide for your device model. Each phone and tablet has a unique internal layout, and prying in the wrong place can sever delicate cables.
Patience is key: Rushing the process increases the likelihood of damaging the device. Take your time, and reapply heat as needed if the adhesive cools down and becomes difficult to cut through.
Practice with caution: For those without experience, it's recommended to practice on a less critical or broken device first.